Getting started with your HP3 TrainingPeaks plan
A simple step-by-step guide to set up TrainingPeaks so your HP3 plan works as intended from day one. Even if you have never used TrainingPeaks before, this page will take you through the essentials in a few simple steps. If you have not yet chosen a plan, you can view our TrainingPeaks plans here.
What is TrainingPeaks and how does it work with HP3?
TrainingPeaks is an online training diary and planning tool that lets you view your HP3 plan, follow structured workouts, and review your training in one place. It uses your personal thresholds and training zones to give meaningful feedback on load, fitness trends, and progress over time.
When you buy an HP3 training plan, it is delivered straight into your TrainingPeaks account. From there you can:
See your whole plan laid out on a calendar
Sync key workouts to your watch, bike computer, or training app
Upload completed sessions automatically and review how they went
Before you start
Before you begin, make sure you have:
A TrainingPeaks athlete account (Basic or Premium)
Your HP3 training plan assigned to that account
Your usual training devices and apps ready to connect
For example Garmin, Wahoo, COROS, Suunto, Zwift, or Apple Watch
You do not need a Premium TrainingPeaks subscription to follow an HP3 plan. A free Basic account is enough to view your plan, log training, and sync most devices.
Step 1 – Set up or link your TrainingPeaks account
Create or log in to your TrainingPeaks athlete account.
Check that your name and email match the details you used when purchasing your HP3 plan.
In Account Settings, confirm:
Time zone
Units (metric or imperial)
Preferred sports (running, cycling, triathlon, etc.)
If you already use TrainingPeaks, your HP3 plan will simply appear in your Training Plan Library or be applied to your calendar once the purchase is processed. (Where is my plan?)
Step 2 – Set your thresholds and training zones
Most of TrainingPeaks’ analysis is built around your functional threshold values for power, pace, or heart rate. These thresholds define the training zones that your HP3 sessions use for intensity targets.
If you do not know your thresholds yet
When you first create your account, TrainingPeaks can estimate a starting threshold based on basic details such as age, weight, and fitness level. This guide helps you understand your new Athlete Account.
This is enough to begin the plan, but it is only a starting point.
Once you have completed the fitness tests included in your HP3 plan, you should update your thresholds and zones in TrainingPeaks:
Open TrainingPeaks (web or app).
Go to Settings → Zones.
For each sport, enter your new threshold values (power, pace, heart rate, as appropriate).
Use the “calculate zones” option to let TrainingPeaks create training zones automatically from your threshold.
After you update thresholds, TrainingPeaks will recalculate your zone-based metrics so that your HP3 workouts are prescribed, and analysed, at the correct level for you.
Step 3 – Connect your devices and apps
Connecting your devices means your completed workouts appear in your TrainingPeaks calendar without extra manual work.
TrainingPeaks can sync with hundreds of devices and apps, including: Garmin, Apple Watch, Wahoo, COROS, Suunto, Zwift, and many others.
In most cases the process is:
Log in to TrainingPeaks on the web or in the app.
Go to “Apps & Devices” or “Connections”.
Choose your device or app from the list and follow the prompts to authorise the connection.
Once connected:
Planned structured sessions from your HP3 plan can sync to compatible devices and apps, so you can follow power, pace, or heart rate targets step by step.
Completed sessions then sync back automatically to your TrainingPeaks calendar, where you can review them.
If a device is not compatible, you can still upload files manually or enter a short summary by hand.
Step 4 – Add your events and apply your HP3 plan
Add your key events
Adding your main race or goal events helps you and the software keep sight of what you are working towards.
In the calendar view, add events for:
Your “A” race
Any key “B” races, long training days, or milestones
Check that the dates are correct and clearly labelled.
Apply your HP3 plan to the calendar
When you purchase an HP3 plan through TrainingPeaks it appears in your Training Plan Library. To apply it:
Go to your TrainingPeaks calendar.
Click “Training Plans” in the left menu.
Select your HP3 plan.
Choose how to apply it:
Set the end date as race day for event-specific plans.
Use a start date for base or general preparation plans that do not finish on a particular race.
Click “Apply” to load the plan onto your calendar.
You can remove and re-apply a plan later if your dates change.
Using your plan day to day
Most of your time in TrainingPeaks will be spent on the calendar.
Reading the calendar
Each day shows your planned HP3 session.
Click or tap on a workout to open it and see:
Workout description and coaching notes
Duration and structure
Targets for pace, power, heart rate, or RPE
Completing a workout
Check the description before you train.
If you have a compatible device, make sure the planned workout has synced and is selected.
Do the session, focusing on the main objective (for example, easy endurance, tempo, threshold, or skills).
After the workout, sync or upload your data to TrainingPeaks.
If you miss or need to move a session
Life happens. A simple approach:
Missing one session: usually leave it and move on to the next day.
Needing to move sessions:
Use drag-and-drop on the calendar if your account allows it, or
Make a simple note in the comments and adjust the structure in practice, for example swap your long run and easy run days.
The priority is consistency over weeks, not perfection every day.
Reviewing your progress
TrainingPeaks gives you several ways to see how training is going.
At a simple level, we suggest you focus on three things:
Completion
How many of the planned key sessions are you actually doing each week?
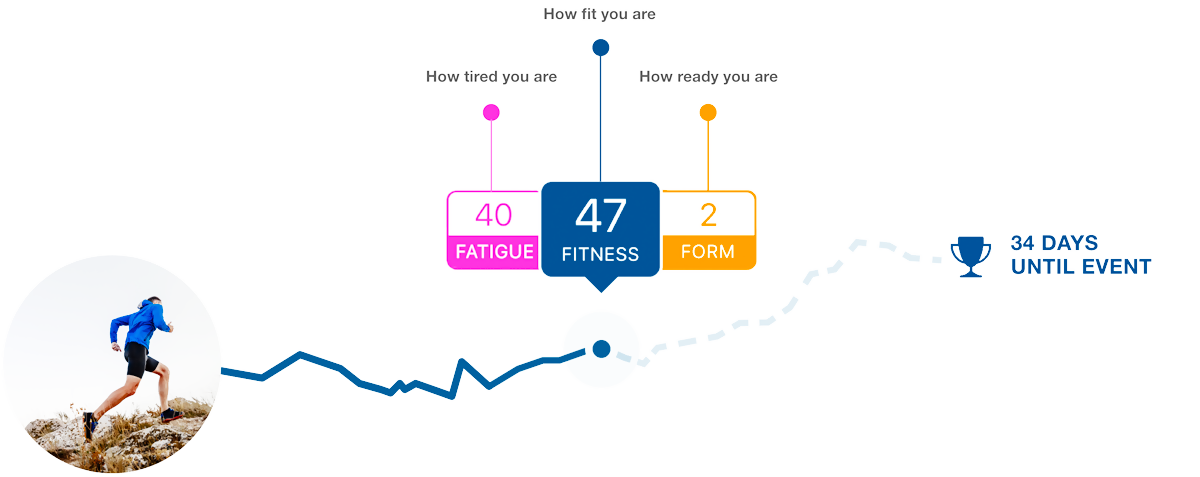
Load and intensity
TSS and similar scores give a single number for the stress of each session.
Over time, TrainingPeaks uses these to show longer-term fitness and short-term fatigue trends (CTL, ATL, TSB).
Comments and reflection
After important workouts, write a short comment: how you felt, nutrition, sleep, any niggles.
This context is often more useful than one more chart.
You do not need to analyse every detail. Use the data to check that training is broadly on track, and to notice patterns in how you respond to different loads.
-
No. All HP3 training plans work with a free Basic TrainingPeaks account. Premium adds more analysis tools and planning features, which some athletes find useful but they are optional.
-
Usually yes. If your device is not directly supported you can often export a file and upload it manually, or log key details such as time, distance, and RPE by hand.
-
You can un-apply the plan and re-apply it using new start or end dates. For small changes, you can also shift individual workouts in the calendar or adjust which days you complete key sessions on.
-
Use the tests included in your HP3 plan to set accurate thresholds, then follow the zone targets on your device or within the workout description. If in doubt, cross-check with how the effort feels using RPE, particularly for easy and long endurance sessions.
-
Yes. The structure and progression of the plan matter more than the exact day on which each session happens. Aim to keep the “hard” and “easy” balance similar to the original design, and avoid stacking several demanding sessions back to back.
Need more help?
If you are unsure at any stage, or your situation is a bit more complex than the examples here, you can:
Contact HP3 for technical support with TrainingPeaks set-up.
Ask about upgrading to 1:1 coaching if you would like fully individualised planning and feedback.
TrainingPeaks is a powerful tool, but it is there to support your training, not to complicate it. Once your account, thresholds, and devices are set up, using your HP3 plan day to day should feel straightforward.